Using Radio Mobile for Windows
Installing Elevation Data
Previous: Installing Elevation Data Next: Creating A Map
A Quick 7-Zip Tutorial
Now that you have downloaded some elevation data you first need to extract it and then configure Radio Mobile so that it can find it. If you downloaded GTOPO30 or DTED data from the sites mentioned previously you may notice the files have the extension tar.gz. In the UNIX world this is known as a "tarball" and this short 7-Zip Tutorial will show you how to extract the data contained within the tarball you downloaded.
The first thing you need to do is open 7-Zip. When you first launch it you will probably notice a window similar to Figure 6:

Figure 6: 7-Zip Main Window
To make it easier to work with files change 7-Zip to a 2 Panel view. Hit the F9 key on your keyboard or click on the "View" menu and select "2 Panel." This should change 7-Zip to look like Figure 7.

Figure 7: 7-Zip 2 Panels View
The next step is to load your tarball into 7-Zip. In the left hand pane, browse to the location where you saved the tarball. Once you locate the tarball, double click on it to load it into 7-Zip. Double click on it once again to view the contents of the tarball. Your 7-Zip window should look like Figure 8.
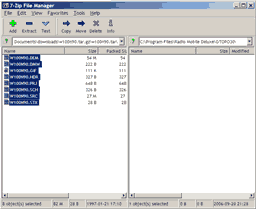
Figure 8: 7-Zip Viewing Contents of a Tarball
Now things can get a bit tricky. You probably noticed that the name of the tarball you downloaded from the GTOPO30 site had a name such as w100n90.tar.gz. Before you extract the data to the directory for Radio Mobile you need to take an extra step. Hit F7 on your keyboard or right click in the right hand pane and select "Create Folder" to create a folder named w100n90. Now you are ready to extract the data.
You should have a list of the files contained within the tarball in the left hand pane. Click on the "Edit" menu and click on "Select All." This will select all of the files in the left hand pane. Now click on the extract button and a window similar to Figure 9 will appear.
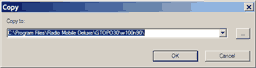
Figure 9: 7-Zip Extracting a Tarball
When you have finished, your 7-Zip window should look similar to Figure 10.

Figure 10: 7-Zip Finished Extracting Data
Extracting DTED Data
If you downloaded DEM data from http://geoengine.nga.mil/muse-cgi-bin/rast_roam.cgi the process for extracting the data is similar. However, if you notice the directory structure within the zip file is somewhat different than with the GTOPO30 tarball. Extracting the data is actually much easier when dealing with zip files downloaded from the NGA site. Simply load the zip file into 7-Zip in the left pane then click on the "dted" folder so it is highlighted. Click on the extract button and make sure the path shown is where you want to extract the data. If you choose to extract to C:\Program Files\Radio Mobile Deluxe 7-Zip will extract everything to a subfolder called "dted." Doing this will make it very easy to configure Radio Mobile to use the DTED data.
Configuring Radio Mobile
Once you have finished downloading and extracting elevation data you need to configure Radio Mobile to use the new data. First click on the "Options" menu and then select "Elevation Data." A window like Figure 11 will pop up.

Figure 11: Radio Mobile Default Elevation Data Settings
Click on the radio button next to "Extract elevation data directly from database." This will give you the option to point Radio Mobile to the location of the data you extracted from the zipfiles and tarballs previously. Radio Mobile allows you to use up to five layers of elevation data ranked from highest to lowest quality. This is also where you can configure Radio Mobile to use shared elevation data over a network. Select the type of elevation data you want to use for each layer then click on the "Browse" button. Browse to the location of the data and when you are finished click on "OK." For example, if you want to use GTOPO30 as your top layer and DTED as your second layer your configuration will look similar to Figure 12.
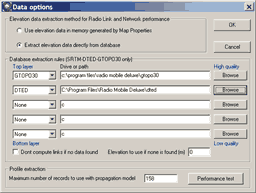
Figure 12: Radio Mobile Custom Elevation Data Settings
You are now ready to create your first map.